
The use of YouTube to teach or learn a language is pretty much a given today.
Yet, speaking with colleagues and students, I realized that not all of them were aware that there are some features available that are really useful for language education. Here are two of them: Subtitles (or closed captions) and the speed at which you watch a video.
1 Subtitles-Transcripts
In most you can display what is said in the video as subtitles, also called closed captions on YouTube, which can be helpful in the classroom or at home.
How to Display Subtitles
To display subtitles all you need to do is to click on the [CC] icon at the bottom right of the video viewer (see the video below). If no [CC] icon is visible this means that closed captioning was not enabled by the person who posted the video.
As the video below shows, using Settings, subtitles, options you can also change the display settings of the subtitles (color, font, etc.).
Being a cyclist, I will use a humorous biking video as an example: 9 Ways to Drink From a Cycling Water Bottle where subtitles are enabled. Conversely, in the video where U.K.’s May Says She’s Sorry for Members Who Lost Seats (an unlucky call if ever there was one!) subtitles have not been enabled.
A word of caution. Subtitles are usually automatically generated and may not exactly, to say the least, transcribe what is being said. (A piece of advice regarding branding: If you produce a short video, it may be worth adding your own text or translation to the video. See here how to do it).
Translating the Subtitles
Wait, there’s more. Not only can you display the text of the video as subtitles, you can also display the translation, which can be practical.
In the case of the “9 Ways to Drink” video for example, once the subtitles are activated I can go to Settings, Subtitles, Auto-translate and choose a target language. Beware again. As the text is automatically translated, this can lead to some interesting results that should reassure translators as to their future.
I’ll let you explore the other available translation options. Some settings are only available to the video creator, the person who uploaded it or to other people if the creator enabled translation contributions by viewers (again see here for more information). In the above video, for example, adding subtitles is enabled.
Transcripts
Another way to see the text of a video is to display it’s transcript.
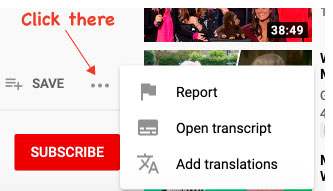
To do this, click on the ellipsis symbol next to the Save menu under the video. Then click on Open transcript, which will be displayed on the right sidebar.Be aware that the transcript might be generated automatically and therefore not very accurate.
2 Changing the Video Speed
Another valuable feature for language instruction is the possibility to change the speed at which a video is viewed. In some cases you may want to slow down the speed of a video to help learners understand it. All you have to do is to click on Settings, Speed and to choose the speed you want.
You can speed up a video as well, which can be practical when a video is slow or too wordy. Speeding up the sound can also help language learners improve their listening skills.
There you have it. A couple of suggestions for a better use of YouTube videos in language instruction.
For more tricks on using videos in your presentations see Using Videos in Your Presentations.